Creating a database in cPanel panel with MySQL Database Wizard
Tutorials • cPanel | cpanel | database | database | mysql | wizardIntroduction
In this tutorial we are going to introduce you to the necessary steps for creating MySQL databases in the cPanel panel using MySQL Wizard.
Requirement
The login details of the hosting package.
Steps
Access the cPanel administration panel, log in with the administration data (user/password) provided by Hostico is performed, and after the successful login we go to the Databases section from which we will click on the MySQL Database Wizard.

- Getting there, they will have to follow a few steps:
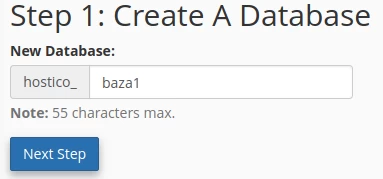
→ 1: Create A Database → fill in the database name (up to a maximum of 54 characters) after the prefix that is automatically assigned according to the cPanel userThe created database will be of the form: prefix_namebase
→ 2: Create Database Users →
fill in the user name for the database (up to a maximum of 7 characters) after the prefix that is automatically assigned according to the cPanel user
Also here you fill in the password for this database user or you can automatically generate a secure password using the "Password generator" button, password that you will have to copy and save in a safe place → then press the "Create User" button
The user of the created database will be of the form : prefix_username
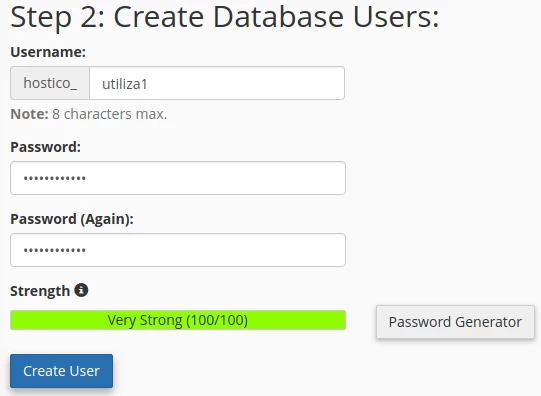
These three elements (database name, username and password) you will use further for the configuration file of the website in the login section of the website with the database.
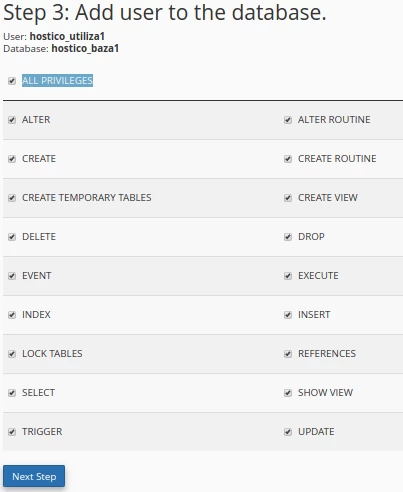
→ 3: Add user to the database → here you will select all the permissions with the option "ALL PRIVILEGES " that the user will use to communicate with the database, in this way the user will automatically attach himself to that database → then press the button “Next Step”.
→ 4: Complete the Task → we have successfully completed the creation of a database, the user with a password for it, and we have performed their coupling with the related permissions for writing/reading information in the database tables.
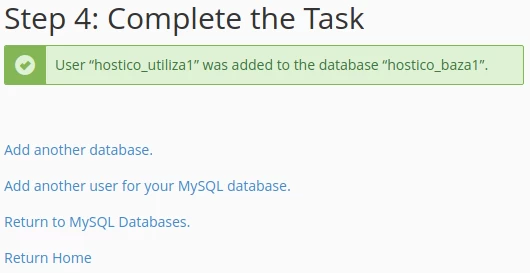
→ Also here we can click on the options:
“Add another database” → to create another database from the beginning using the same steps;
“Add another user for your MySQL database” → to add a second user to the previously created database;
“Return to MySQL Databases” → to go back to the viewing section of databases already created;
“Return Home” → to return us to the main page of the cPanel panel;